#Denver
Encaustic Painting Process
Tuesday/September 30/2014 Filed in: Encaustic Painting
I have had a few questions regarding my art process and thought I would post about my process. I’ve been experimenting with encaustic for about two years and for the last 6 months began adhering pencil drawings to the surface of encaustic.
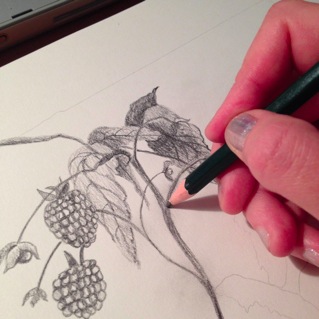
1. First, I create a drawing based off of a photo from my library. (When I say “library”, I am referring to 1,000s of original photos I have been collecting for years.)
For the pencils, I use a variety of drawing pencils ranging from 2H, HB to 6B. Even thin, soft lines can be transferred, so it is not necessary to make all your lines dark.
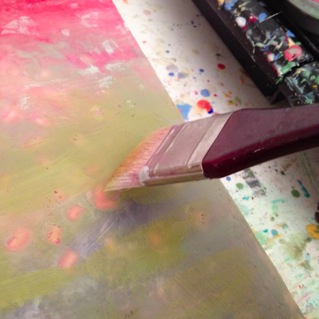
2. Time to heat up the encaustic paint!
Encaustic is basically a type of wax that contains pigment, and when it is heated it can be applied with a natural paintbrush (synthetic will melt!). I build up many layers of colors, scrape parts away, and sometimes carve it. If you have never used encaustic, you are missing out. The look and feel is completely different from oils or acrylics and it is so fun!
For my painting base, I only use Ampersand’s Encaustic Boards.
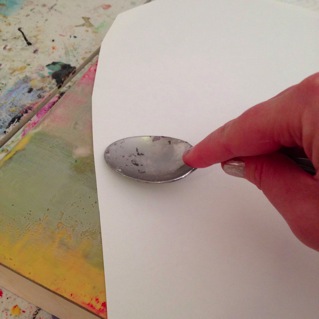
3. Turn the completed drawing upside down and place it on the cool or slightly warm, wax surface. If the encaustic paint is too hot your drawing will stick and you will more than likely pull up chunks of wax and ruin your drawing.
With a spoon burnish the backside of the paper. Make sure you that you rub everywhere and well. Take your time so that as much of the pencil can adhere to the wax as possible.
4. Slowly start to lift the paper from the painting. Some of the paper will stick and tear, which is ok. It is easy to remove bits of paper later and polish the piece.
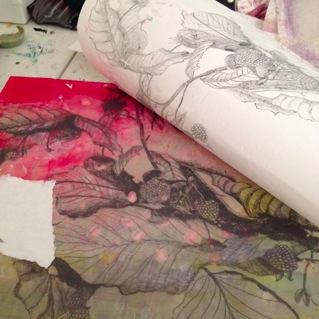
5. Carefully remove small pieces of paper with a knife or small tools. Use the heat gun to heat the surface. Be careful that you don’t get the tip too close to the painting. The goal is to adhere the pencil and wax together but if the surface gets too hot, your drawing will disintegrate!
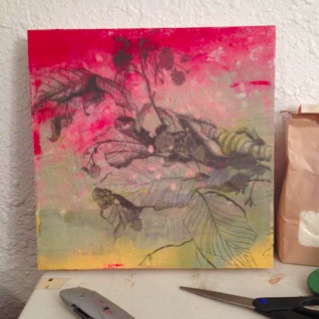
6. This is the final piece sitting in my studio. The great part of this process is that I really don’t know what the finish product will look like until it is done - the element of chance. However, the more I create, the more I can think ahead about how the drawing will be placed on the board and how it will match up with different pigments.
Also, I have been told that you can also copy your drawing with a toner copier and this will work the same as the pencil drawing. The advantage is that you can use the same image over and over. I have not tried that yet. If you have, let me know about it!
1. First, I create a drawing based off of a photo from my library. (When I say “library”, I am referring to 1,000s of original photos I have been collecting for years.)
For the pencils, I use a variety of drawing pencils ranging from 2H, HB to 6B. Even thin, soft lines can be transferred, so it is not necessary to make all your lines dark.
2. Time to heat up the encaustic paint!
Encaustic is basically a type of wax that contains pigment, and when it is heated it can be applied with a natural paintbrush (synthetic will melt!). I build up many layers of colors, scrape parts away, and sometimes carve it. If you have never used encaustic, you are missing out. The look and feel is completely different from oils or acrylics and it is so fun!
For my painting base, I only use Ampersand’s Encaustic Boards.
3. Turn the completed drawing upside down and place it on the cool or slightly warm, wax surface. If the encaustic paint is too hot your drawing will stick and you will more than likely pull up chunks of wax and ruin your drawing.
With a spoon burnish the backside of the paper. Make sure you that you rub everywhere and well. Take your time so that as much of the pencil can adhere to the wax as possible.
4. Slowly start to lift the paper from the painting. Some of the paper will stick and tear, which is ok. It is easy to remove bits of paper later and polish the piece.
5. Carefully remove small pieces of paper with a knife or small tools. Use the heat gun to heat the surface. Be careful that you don’t get the tip too close to the painting. The goal is to adhere the pencil and wax together but if the surface gets too hot, your drawing will disintegrate!
6. This is the final piece sitting in my studio. The great part of this process is that I really don’t know what the finish product will look like until it is done - the element of chance. However, the more I create, the more I can think ahead about how the drawing will be placed on the board and how it will match up with different pigments.
Also, I have been told that you can also copy your drawing with a toner copier and this will work the same as the pencil drawing. The advantage is that you can use the same image over and over. I have not tried that yet. If you have, let me know about it!
Comments